First Charge: Confirm the Basics
- Read the Equipment Instructions. Use a suitable installed wallbox or rated portable charger and supply. Do not improvise adapters or extension arrangements.
- Inspect before Connecting. The manual says the port should be dry and free of foreign matter. Do not use visibly damaged equipment or force the connector.
- Check the Target. In Energy Centre, make sure the selected charge limit is above the current battery level. Choose a target appropriate to your next journey and the manual's battery-care advice.
- Check the Schedule. For a supervised immediate test, ensure a vehicle or charger schedule is not deliberately delaying charging. Record settings before changing them.
- Check the AC Current. Open Energy Centre, then choose Slow Charging Current Limit. Available levels are 8, 10, 16 and 32 A; the vehicle cannot draw more than the connected charger offers. Keep the complete setup within its ratings.
- Connect as Instructed and Confirm Charging. Check the vehicle screen for an active session and power, then compare with the charger display or app where available. Plugged in does not necessarily mean charging.
- Check Again after a Short Interval. Confirm progress and record the approximate rate. Use the equipment's stopping procedure before disconnecting; do not pull a locked connector.
If the equipment is unusually hot, smells burnt, is damaged or repeatedly trips protection, stop using it and have the equipment or installation assessed. Do not repeatedly reset a protective device to keep charging.
Open the Charging Port
Park and power the vehicle off, or keep it powered on in P with the electronic parking brake applied, as the manual permits. The charging port is on the rear left side of the E07.
- Unlock the vehicle with your key.
- Press the charging-port cover; it opens automatically after the vehicle is unlocked. The centre display also offers port-cover control.
- Open the dust cover for the AC charging socket. Keep the port and connector dry and free from debris.
Plug in at Home
Follow your wallbox or portable charger's instructions for powering and preparing it. For an untethered wallbox, connect the cable at the charger end as its instructions require. A tethered wallbox already has its cable attached.
- Check that the connector and socket are clean, dry and undamaged.
- Align the AC connector with the socket and insert it fully without forcing it. Support the cable so it does not pull on the port or create a trip hazard.
- Confirm charging on the vehicle display. If a schedule is enabled, it may wait until the selected window.
The manual describes flashing green as charging in progress and yellow as connected but charging not started. Steady green can mean completed charging or waiting for scheduled charging; check the vehicle screen to distinguish them. Red indicates an abnormal connection or charging failure. Purple flashing refers to supplying external power, rather than charging the battery.
Stop and Disconnect
You do not need to reach 100% before ending a session. Use the charger or vehicle's normal stop control as applicable and follow the equipment instructions.
- Stop the charging session and confirm it has stopped.
- Unlock the vehicle with the key. For AC charging, the manual also describes opening Energy Centre and choosing Unlock Charging Port to release the connector lock.
- Once released, hold the connector body and withdraw it straight out. Do not pull the cable or force a locked connector.
- If using an untethered cable, disconnect the charger end according to its instructions and store the cable. Return a tethered connector to its holder.
If the connector remains locked, check the normal stop/unlock procedure again and consult the manual or support. The Emergency AC Charging Connector Release guide explains the manual’s AC emergency procedure; it should not be your routine disconnect method. Keep the vehicle stationary while connected.
Close the Port
- Refit/close the charging-socket dust cover after removing the connector.
- Check that the cable and your fingers are clear of the outer cover.
- Press the port-cover closing button; the powered cover closes automatically. The centre display can also control it. Do not force the powered flap shut.
- Confirm it has closed before driving away and put the charging equipment away.
E07 Owner’s Manual — pp. 85–86 (PDF pp. 96–97); E07 Owner’s Manual — p. 89 (PDF p. 100).
Equipment Limits and Charging Estimates
What the E07 Can Accept
The Australian September 2026 specification lists a maximum AC charge rate of 7 kW. Home wallboxes and portable AC chargers supply electricity to the car's onboard charger. A wallbox labelled 11 or 22 kW does not make the E07 exceed its own AC limit. DC fast charging is a separate process; its headline speed is not available from an ordinary home AC wallbox.
A higher-rated wallbox may serve a future vehicle or another car in the household. Decide that with the installer rather than paying for extra capacity on the assumption this E07 will charge faster. The installation, available supply, charger output and car settings all affect the result.
Choose a Setup around Your Driving
Portable Charging: potentially useful for modest daily top-ups or backup, provided the charger and supply are suitable. Read the output rating: a charger with a 10 A plug may deliver only 8 A. Having a socket nearby does not establish that its circuit is suitable for sustained charging.
Dedicated Wallbox: useful when you need more energy overnight, regularly arrive with a low battery or want scheduling and energy controls. Ask a licensed electrician to assess the switchboard, circuit, available supply and charger installation. Ask for the expected power available to this vehicle, not just the wallbox's advertised maximum.
Solar-Aware Charging: may suit a home with spare daytime generation, but actual output can vary with cloud, household demand and the charger's control behaviour. Ask how the system handles low solar output, whether it can use grid power and what happens when the car is plugged in outside the schedule.
Before choosing equipment, note your typical kilometres per day, recent vehicle consumption, hours parked at home, available daytime charging and any second EV. If you rent or use shared parking, establish installation permission and the practical cable route before arranging work.
Estimate an Overnight Top-up
Use energy needed ÷ achievable average charging power = approximate hours. For a target battery level, first record the starting percentage and intended charge target, then estimate the energy difference using applicable battery-energy information. For a driving top-up, use recent consumption rather than advertised range. Allow for charging losses and changing power; charger nameplate power alone is insufficient.
Example: 60 km of driving at an assumed 20 kWh/100 km uses about 12 kWh. Those numbers illustrate the calculation; they are not a measured E07 efficiency claim. Allow additional electricity and time for charging losses and changing conditions.
Scroll Table to See All Columns
| Example Charging Power | Ideal Time for 12 kWh | Planning Note |
|---|---|---|
| 1.8 kW | About 6 h 40 min | A low-power portable top-up can cover modest driving if enough time is available. |
| 3.7 kW | About 3 h 15 min | Requires equipment and a supply suitable for that output. |
| 7 kW | About 1 h 45 min | The published AC ceiling; actual average power may be lower. |
These are arithmetic lower-bound examples before losses, not promised completion times. A short cheap-rate window may not be long enough for a large top-up. Check the actual energy delivered during your first few sessions and adjust the window accordingly.
Set up Overnight Charging
For home AC charging, open Energy Centre in the car, then choose Schedule Charging, as described in the manual. It uses a start and end time, repeats daily by default and does not charge outside the selected window. Charging can stop when the window ends or the charge limit is reached.
- Confirm the Electricity Plan’s Actual Window. Use your retailer's current terms, including any seasonal or time changes. Do not assume a generic overnight tariff applies.
- Choose One Schedule Controller for the First Test. Configure either the car or charger to control the window and ensure the other permits charging. If both remain active, charging is permitted only during their overlapping window. For example, a car window of 22:00–04:00 and a charger window of 00:30–05:00 leave 00:30–04:00 jointly permitted. That overlap does not prove a session will start or finish.
- Leave Enough Time. To estimate whether the battery will reach your target, check the starting battery percentage, intended charge target, energy needed, achievable average AC power and jointly permitted hours. A target below 100% does not request a full battery. Use your measured rate and allow for losses; solar-only or load-management settings may reduce available power.
- Test before Relying on It. With the connector properly engaged and equipment ready, connect before the start time. Check that the current battery level is below the intended target, then confirm charging actually begins within the jointly permitted window and reaches the needed level by departure. Do not discover a failed schedule immediately before a long trip.
- Review the Next Morning. Note starting and finishing battery levels, the charging duration and any error message. Adjust one setting at a time if the result is unexpected.
Check Charging in the DEEPAL App
- Select Your E07. Check My Car refers to the intended vehicle, including any Vehicle Shared badge.
- Open Battery. Tap the home Battery card to see battery percentage, EV Range, Charge Limit and Scheduled Charging.
- Compare with the Vehicle. Check the app against the actual charging state before relying on a reading or change. A displayed value does not establish when it last refreshed.
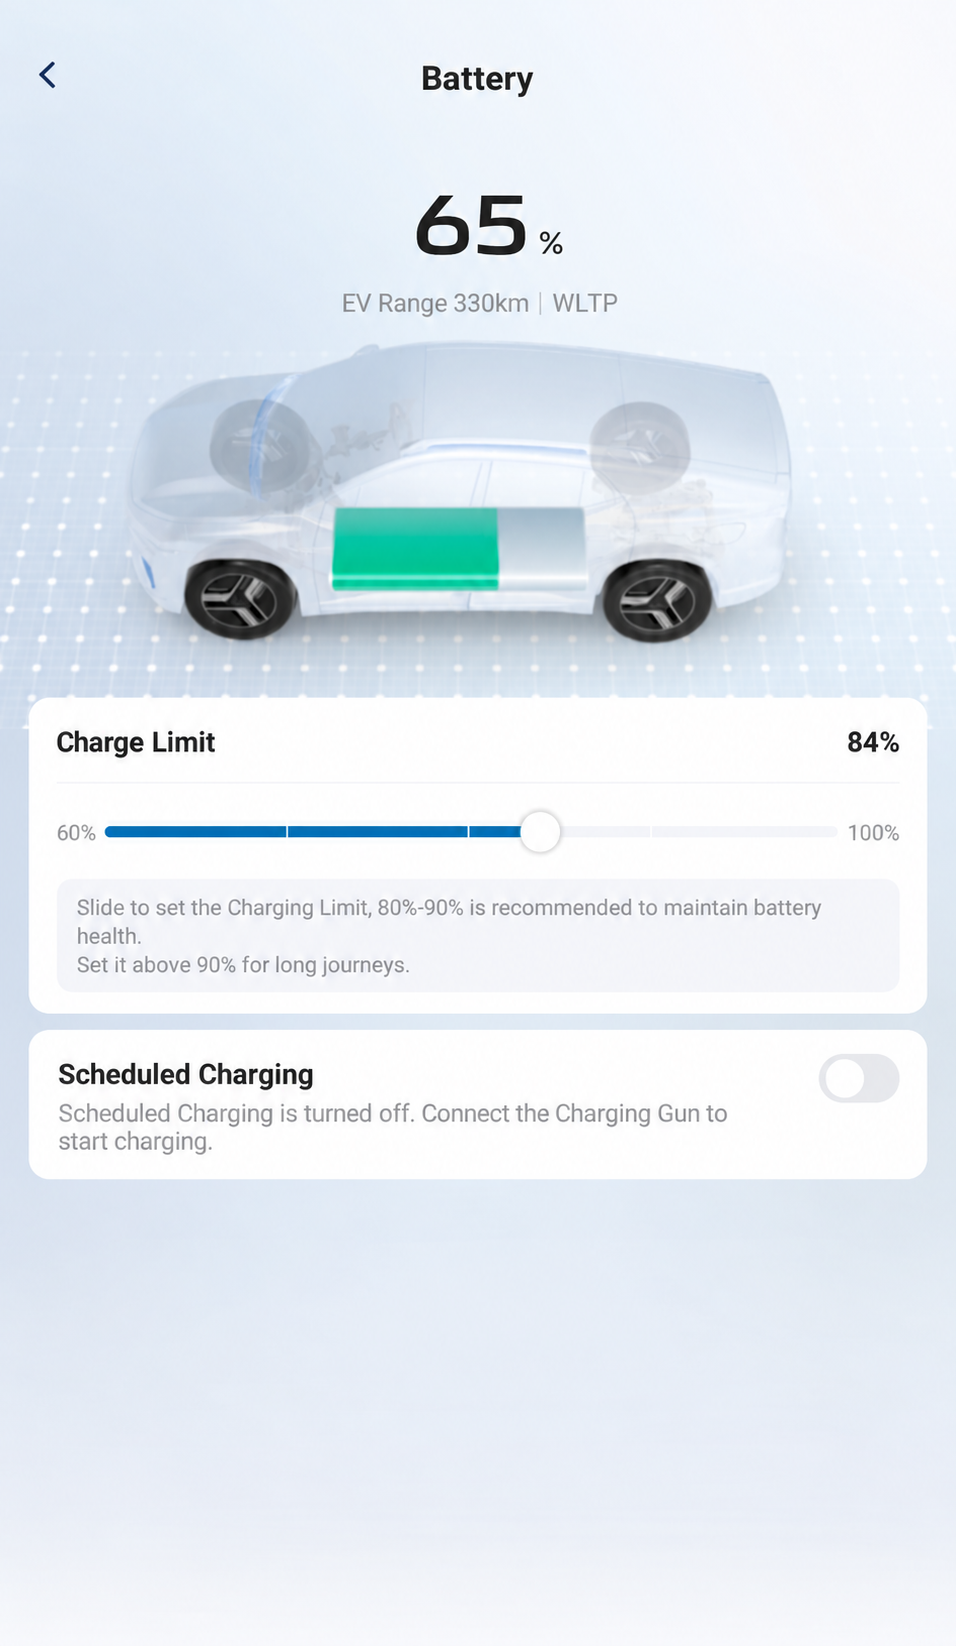
The illustration shows 65%, EV Range 330 km / WLTP, Charge Limit 84% and Scheduled Charging off. These are dated observations, not recommended targets. Visibility to a shared recipient does not establish editing rights or successful application.
AI-Edited App Reference · Android V1.12.0 · Australia · Shared E07 Recipient. Screens and available controls may differ by account and app version. Reviewed 10 October 2026.For an authorised limit change, follow Charge Limit in the App and use the slider and any apply controls actually presented. The illustrated slider spans 60%–100%. Follow its current increments and any apply controls; do not assume a Save button exists.
In the app, open Battery and find Scheduled Charging. The example shows its switch off, with a helper saying that connecting the charging gun starts charging. It does not show the expanded schedule editor. Check the time/day fields, repetition, timezone and confirmation prompts offered by your app. The start/end times and daily repetition described above belong to Schedule Charging in the car’s Energy Centre; they are not established as app fields. Use Scheduled Charging in the App for a change guided by the controls your version actually offers.
Remote app readings and changes also need the intended account, vehicle access and working connected services. Check App Connection Requirements. Missing km/range or stale status can trigger those checks; neither uniquely identifies a network or battery fault. See Missing Range Troubleshooting. A public charger or wallbox app manages that equipment’s session/settings; its controls are separate from DEEPAL’s vehicle controls.
Charging Is Slow or Will Not Start
- No Charging, No Fault Shown: check the target battery limit, the vehicle schedule and any wallbox schedule or solar-only setting.
- Lower Power Than Expected: check the charger's actual output rating, selected AC limit and installer-configured load management. A 22 kW label does not override the E07's 7 kW AC maximum.
- A Current Option Is Greyed out: the manual says a value above the connected charger's maximum cannot be selected. This can be normal with a lower-rated portable charger.
- 32 A Unavailable on a Suitable 7 kW Charger: the manual specifically says to check that the boot socket cover is completely closed. This applies to that symptom; it is not a universal diagnosis. Do not bypass an interlock.
- A Charging Fault Persists: stop the session using the proper procedure, record the message and follow the manual and equipment instructions. Contact an authorised service centre or installer as appropriate.
Keep a useful record: date and time, starting battery level, charger make/model and rating, vehicle current limit, both schedules, any load or solar mode, the exact error and whether another known suitable charger works. A difference between chargers is useful evidence, but does not on its own identify which component is faulty.
Your First-Week Checklist
- Confirm the setup's suitability with the installer or equipment instructions.
- Complete one supervised immediate charging session.
- Confirm the actual charging rate and estimate your daily top-up time.
- Test a scheduled session and verify the result at the vehicle.
- Save the equipment instructions and installer/support details.
- Identify a public charging backup before you need it.
DEEPAL E07 Features & Technical Specifications — PDF p. 2.
E07 Owner’s Manual — pp. 86–87 (PDF pp. 97–98); pp. 69–70 (PDF pp. 80–81).
Australian Android V1.12.0 Battery reference with a shared E07 recipient account, checked 10 October 2026. These illustrations do not establish editing rights or successful charging.